Contents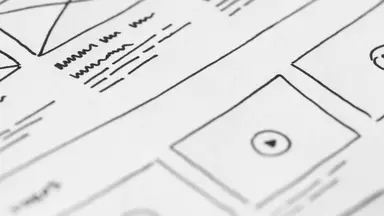 Part 1What is Prototyping?
 Part 2Why Prototype?
 Part 3Prototyping Type to Use and When
 Part 4Prototyping Goals
 Part 5Steps in Prototyping
 Part 6Prototyping Risks
Your Vision. Comes to Life.

Today I'll provide a thorough coverage on the topic of using a prototype in building a SaaS product. The prototype is a key element in reducing risk, something we are focused on at Software Prophets. We'll cover:
ContentsPart 1What is Prototyping?Part 2Why Prototype?Part 3Prototyping Type to Use and WhenPart 4Prototyping GoalsPart 5Steps in PrototypingPart 6Prototyping Risks
Before we get going, we should understand what a prototype is. Our focus in this section will be:
Many of you may have seen a clay model of a car that car manufacturers would use in order to work out the style and design of a car that the manufacturer was planning to create. Although not using clay, software development follows a very similar approach in that we may use an alternate development approach from the final tools and techniques as a shortcut to what would otherwise be very labor-intensive.
The definition that I will use is:
A prototype is a representation of a final product, developed using labor-saving approaches, for the means of communicating and testing the efficacy of a proposed product build towards improving jobs-to-be-done and providing a quality user experience.
Let’s break that definition down into its parts and expand a little:
A prototype is a representation of a final product. It is not the final product. It probably will not even look like the final product, although some high-fidelity final prototype deliverable may be pretty close.
Developers are often not involved, as the prototype is typically developed using labor-saving approaches, such as hand-drawn sketches, software specifically designed for creating prototypes, or other means of easily representing user interactions. That doesn’t mean there isn’t value in involving developers, it just means they are often not required for prototype development.
The prototype is meant to provide a way to communicate ideas.
This communication is used for the purpose of testing whether the goals of product will be achieved, such as improving the jobs-to-be-done of the target product consumers.
This communication is also used to test things like user experience, consisting of things like the flow of the application, the use of controls, the density of information on a page, spacing and consistency of elements, and many other such things.
Given that a prototype is both a mere representation and a means of communicating and testing, by definition, we already have a sense of scope, but let’s get into some specifics.
Typically, a wireframe or paper prototype will be the start of your representation. Later in this article, we’ll get into more detail about what a wireframe or paper prototype is. For now, know that these are low-resolution or essentially hand-drawn depictions of pages.
As information is gathered, we may increase the fidelity of the representation, bringing it closer to its final look. The goals of what you were trying to achieve with the prototype will drive the need for getting into a higher fidelity depiction.
The scope of your prototype will vary depending upon the goals you are trying to achieve. We will cover the goals in more detail a little later.
Why should we take the time to create a prototype? Odds are high that it is a great investment. Here are some things will take a look at:
The biggest reason to produce a prototype, and perform all the activities around testing the prototype, is because it mitigates risk. This risk can be at least in the form of time risk, money risk, and quality risk. In other words, all of these product development metrics can be in jeopardy when software is developed and deployed without properly validating various designs.
Many may view prototyping as either a waste of time or providing only a slight advantage. Unless you have some special power of clairvoyance or can predict future events, then it is very likely that a prototype will be a high-value activity.
Time and money risks are quite often part of the same cause, so we will discuss them together. Creating a prototype is likely a huge positive impact in reducing risk. Consider these impacts:
The prototype tests uncover information about what will work and what is likely not to work. Finding this out after the software is developed means that programming work must be redone. Code needs to be refactored and retested and debugged. This all takes time, even if the one doing the development is a really fast programmer or if you are using some kind of no or low-code programming solution.
Given that changes can be made so rapidly, one can very quickly make a change and run that by a user, perhaps even during a meeting with a prospective user, although more commonly, changes would not be done in real time. Now you have two or more representations that you can show to the next user, and get even more information.
Inability in growing a SaaS business is more often due to customer churn. Getting it right the first time means a lower likelihood of user churn and therefore less time selling. This point has the potential for an exponential time and money savings combined with revenue increases.
Imagine getting it right the first time. Users that use your product for the first time do not leave to try a different product. The time and money that you spent acquiring the customer is not lost. Because of the previous two points, you were able to retain the customer and possibly even acquire new customers through referrals from the happy customers that stayed.
See what happens here? You acquire customers that stay. They refer you to other customers who stay and refer you to other customers. If you were spending time experimenting with your first customers, you would have missed all this opportunity and consumed a fair amount of time.
Have you ever heard someone say, “If I had it to do over again I would…” What is implied in the statement is that if the person was able to do something a second time, then the result would have been better. This is precisely what prototyping gives one the ability to do. Because the cost of iterating is so low, it is performed for as many times as is necessary.
You have the ability to make changes until additional changes yield little or no return. The positive impact on quality cannot be overstated, when done right.
Building the application correctly the first time happens when you show a diverse user group what you think they want, get feedback, and then use your own discernment to decide what goes in the product and what is left out. Then, with several iterations, you can decide what is working and what is not without a line of programming.
There are many other additional skills that go into this, like using empathy to uncover a wide range of emotions that might be associated with the use of your product. That would be the topic of another article.
In some ways using a prototype, is better than having the real thing! Shiny object syndrome, those things that distract and pull us away from the task at hand, can be a real battle. How can we overcome this when testing our plans for building an application?
We’ll discuss later the block only element representation, but what we will find is that it is excellent for determining the structure of the application. How does one go from one page to another page? What is the overall feel of a page? What is the overall density of information content and images on a page?
Answering these questions, sans content, makes it much easier to focus on only the questions at hand. When using the block only element representation of a page or a wireframe, focus isn’t drawn away looking at images or textual content. It is easy to get distracted and start thinking about what a page says or how colors or images are making you feel. These distractions are quite powerful. We know that color, for example, is significant in terms of setting mood. Eliminating all such distractions gives us a more singular focus.
A prototype page can often be your secret weapon in achieving truly valuable results in certain types of tests that you may want to run for your application.
Wireframing, visual design and usability testing are all elements of a UX design project. Providing a useful product to your users - something that solves a problem - is the most important thing you can do. The second most important is providing a great user experience. A prototype is not guaranteed to cover the same topics and tests that one would perform in a UX project, but there is typically going to be some overlap.
In a full UX project you would be spending time ahead of creating a prototype, getting to know your customer better. If you implement Software Prophets’ proof of concept product, then you will have already done that leg work. If you include a visual design, then you likely will have completed the full breadth of a UX design project.
The work you do in creating page representations, testing with users and creating a full prototype with further testing, ultimately drives the main elements of a UX project.
Now that we know what prototyping is and why to do it, it is time to understand the vehicles of prototyping. We'll cover:
Prototyping isn’t all about having a working representation of your full application. Ultimately, that is what we are driving to, but there are stops along the way. One can prototype a page at a time without necessarily demonstrating interactions between pages. What follows is a discussion of the progression from start to finish. Depending upon the goals of the project, you might start at a different spot, and you might end short of a fully working prototype. What type of information you are aiming to obtain should be the driving criteria.
In the early stages of developing prototypes, it is sometimes helpful to work on understanding the structure of a site. This might include creating a site map. You want to see how you get from one page to the next page and how you might get to the same page from multiple locations.
You might also be concerned with a really high-level view of the feel of a page. For example, you might want to understand if you want a header and footer and what kind of content in what kind of structure will occur between those two elements.
In either case, you create a representation of a page containing only empty block images where it is anticipated that content, images, charts or other structures will exist. This can be used in order to provide a sense of page density. In early stages, it saves time drawing components when one is uncertain whether certain elements might be on one or multiple pages, or if an element on one-page might be swapped out with a similar element on another page.
Typically, one would use this in the early stages of building a prototype. Also, use it anytime you want to play around with site structure or moving page elements around.
This is a step up from the block only elements. With the paper prototype, we are still representing pages, but we have freedom to represent the elements with more detail, color and even with printed images. With this, we are literally cutting and pasting!
When showing the paper prototype to a user, you present a page and ask the user to interact with that page as if it were real. The user might, for example, tap on a button that saves the entry on a form. When that entry is saved, a user might be taken to the next page. You would remove the page the user was looking at and present a new one along with narration like, “You hit save. That saves the entry and takes you to this page.” It isn’t required that you use paper. This could be done electronically with a similar ease.
That kind of interaction would continue until the entire flow you wanted to test was complete. You might go back to certain pages and try a different flow, or ask for input about particular pages.
One might use the paper prototype as a next step after the block only depiction. It combines the elements of testing structure along with testing the types of controls and content that will reside on a page. Whereas a wireframe, which we will discuss next, includes concerns not covered by the paper prototype, the paper prototype is mainly concerned with flow between pages, proposed functionality and page behaviors. When you want to test these elements, in a low-resolution way, the paper prototype is a good choice.
Wireframing has a larger list of concerns it attempts to address. Namely, it is concerned with:
The first two of those, space allocation and hierarchy and prioritization of content, are perhaps the more important elements of consideration when using low-resolution wireframing. If however, the wireframe is the only approach used, for example, not using a paper prototype, then all of these concerns might well be top of mind.
Certainly, the other elements may as well be tested, but the big differences between a wireframe and a paper prototype are that a wireframe is typically more precisely drawn, or created in a computer program, in order to more accurately communicate the placement, space allocation and hierarchy of elements on a page.
Wireframes are typically void of color and one would not use real images, such as a stock photo. Particularly in the early stages, text is often minimal, opting for lorem ipsum for a majority of the text representation in order to capture the spacing of a typical quantity of text.
As there is need, which will vary from project to project, one might move toward higher resolution wireframes in order to communicate a final design that can be passed on to a UI professional and/or a graphics person to create a final pixel-perfect representation to pass on to developers. When getting to this stage, color and images are more likely included. Alternately, we might save this task for the full resolution, functional prototype.
One can use this instead of the paper prototype, or to further refine the block only element depiction or the paper prototype. This would be used when one needs to consider all the five concerns mentioned above, or needs to augment the work done in the paper prototype in order to show space allocation and content placement.
A full resolution page depiction will most likely be done inside a graphical editor or might be done by using HTML and CSS. In either case, we are interested in developing a depiction that is as close as possible to what the final product will look like.
For some projects, this will be enough. For others, we might want to add the ability to click through different pages in order to more deeply simulate the final state of the application. One could also include some representative data that changes based upon user input.
Again, we want to minimize the amount of effort put into the prototype work so that we don’t have barriers to making quick changes. Once getting to this point, we have already answered most of the questions we were going to pose to users which would create substance to changes. At this point, we are looking for some level of finalization of the look and feel of the application.
It is possible at this stage that a substantial change is warranted. It is still far better to do it at this stage rather than trying to do it later. By the time we get to this point, we are expecting few changes.
The full resolution functional prototype is very beneficial when working with a remote development staff. In such a case, you can ship a working depiction of the application you want developers to create.
It is also good to use this type of structure when they people you are working with are finding it difficult to conceptualize around low-resolution depictions. Some earlier attempts can be a bit abstract and some individuals find it very difficult to work at that level. If a key member of the team or a particular segment of users requires it, then definitely consider using the full resolution functional prototype.
Prototyping definitely needs to be done for a reason. In this section, we'll consider:
A lot of people come to the market with a product idea. Hopefully, you came to the market with a problem idea, and then developed a product that solved that problem. Regardless of how you came to the market, hopefully you performed a jobs-to-be-done analysis. If you worked with Software Prophets on your proof-of-concept, then you would have performed a jobs-to-be-done analysis. You would have studied what your users need and developed a product that customers will find useful and are likely to allocate budget to solve their problem.
Using the prototype, you can now start to put a concrete example in front of people and begin to learn if the proposed solution will provide enough value to warrant a purchase or on-going subscription. Using the understanding you acquired through the jobs-to-be-done analysis, you can now ask would-be users to imagine using the software in place of current processes. Provide the user with simulated responses to their simulated inputs.
Using the process map that was developed in the jobs-to-be-done analysis, you can determine where the application is going to fit within their processes. Two open-ended questions, you should be able to come up with how much of a lift this will present for user productivity.
This isn’t limited to businesses either. Every product solution is solving a job-to-be-done. Pulling up a mapping application addresses the job of getting to another location, for example.
During the proof-of-concept, there should have been a competitive analysis. As part of that competitive analysis, you should have determined the functionality that sets your application apart from others. This differentiated functionality, being part of your product strategy, should be present and part of the testing that is offered to those matching your ideal customer profile.
If this differentiating strategy is sufficiently substantive, such that customers will select your product over another product, then it should withstand the scrutiny of being tested. Perhaps you might even consider setting up a test whereby you mock the functionality of a competitor that does not have the functionality you are intending to include as your differentiator, and then show your differentiated product and asked which product would be most useful.
Alternatively, you might consider a prototype with and without the differentiated feature and ask users how important it would be to have the added functionality. If the functionality is indeed a differentiator, then there ought to be a rather significant sense of loss by the user faced with the idea of using the product without that feature.
I discussed this earlier, so I won’t spend much time on it here, but the prototype is an excellent way to determine the structure of the application. How users will flow through the application, how a swipe or a click on one page impacts getting to another page, or what data is produced in what parts of a page and under what conditions, are the types of questions that can be answered by the prototype.
Having a clickable prototype is a wonderful way to communicate with developers how an application is to work. Using textual descriptions, it can be extremely difficult to communicate a flow through the application, how events are responded to.
This gets even more difficult if your developer’s native language is different from yours. It is even worse when the design is handed to an individual speaking your language and then passed on to an individual who does not speak your language.
Whether there might be a communication barrier or not, they’re absolutely is a communication barrier with regard to a static drawing and how events are processed. Without a video or discussion, the next best way to describe functionality is for that functionality to be present in a working prototype.
Each project is unique, but I will cover the generic steps that one should consider taking in performing a prototyping project.
When it comes to the steps of prototyping, there are generic steps that one can take, but as we have already mentioned, there are goals that each project may uniquely have. You will have to make good judgments on whether all of these steps are appropriate for your particular project.
What follows are the steps that make up our product offering. When we offer this product, we tailor the experience to the specifics of the product that you are trying to build. Just keep that in mind that not all of these steps are specifically necessary for your particular project.
You start by generating a list of the user interface elements you’re intending to use on your pages. Here is where you would list the charts, drag/drop controls, special calendar controls and like elements you expect to use. Getting this list sets the stage for determining the types of pages you expect to use.
This is a great place to start thinking about the pages you will want to provide. Often, if there’s some kind of dashboard or special data entry area or place where people will interact heavily in some special way, getting this out as an anticipated feature will aid heavily in getting out the overall structure of the application. In other words, this is a great starting point.
With this, you will want to contemplate the justifications for each of these. You don’t want to add special functionality just because it looks cool. You want to make sure you have a practical reason and intent for these actions. One way to really determine a justification is to play the role of someone arguing against adding it. Can you form anything close to a reasonable argument? If so, then dig deep and understand your motives.
As mentioned before, there is a lot of overlap with a UX project. In this step we are specifically concerned with driving a successful business outcome. You want to design a feeling you want the user to experience. The users need to obtain an outcome that you uncovered using the jobs-to-be-done research. When done right, users will feel that your product is superior to the competition because it is somehow set apart in a way that makes your product more useful.
There are lots of different ways people can feel when they use your product and experience your company. In addition to your product, there may be some kind of service that is provided? The collective experience, in total, is the user experience.
As we start representing the pages that we want to prototype, we will need an overarching style. For example, if you want your site to use the material UI style, then you are going to want to define that very early on so that as you depict your pages, you can show a representative style.
If you don’t, the style you end up using can affect things like the density of a page, which you might be attempting to test during the prototype. Again, using the material UI example, form elements have styling of that are much more compact than other styles that place the header outside of text entry.
Ideally, you define your style guide now so that whenever you are depicting pages you are utilizing that style guide. Later, if you find that users are not gelling with your style, you can go back and change the style guide if it is determined to be appropriate. More likely, you won’t receive feedback on that and the style that you have selected will be the one in play going forward.
By having the style guide, you will be driving a standard look and feel right from the beginning.
Now we start sketching out some of the elements that we want on different pages. We want this sketch to be super low fidelity and more of a brainstorming session. Just start imagining the types of data that you are going to want to collect and how you are going to want to collect it. Similarly, imagine the types of information you want to display and in what manner you will want to display it.
We aren’t looking for concrete ideas in the step. Rather, we want to start to flesh out how information is going to flow through the application. In the next step, we will start to isolate what that final flow will look like.
You should approach this as a evolutionary kind of exercise. You want to get a kind of basic scaffolding around your ideas and in following steps you will build around this scaffolding. You might at times tear down some bits of the scaffolding as a kind of failed experiment. That is all part of the process and a healthy approach to getting to a final product that is of high quality.
Capturing the flow of an application in a textual description is very difficult. If possible to easily depict, it is great to have some kind of pictorial representation of the events that are going to occur within the application.
This can be in the form of a storyboard. The more difficult it is to describe what is happening within the application, and interactions outside of the application, the more likely the storyboard will be an excellent choice.
The storyboard is a very handy representation because it can include not just the view of the page, from one page to another, but can also include some information below the page mock or screenshot about what is going on behind the scenes in the use of technology, or it can simply be a description of the rationale for what is going on in a given page, or include business information.
In order to protect client information, the following example is low-resolution, but demonstrates an example format. Along the top, a user story is presented, followed by proposed screenshots. After that, in this example, are swimlanes of “Feature”, “Server Communication”, “Server Execution” and “Technical”.
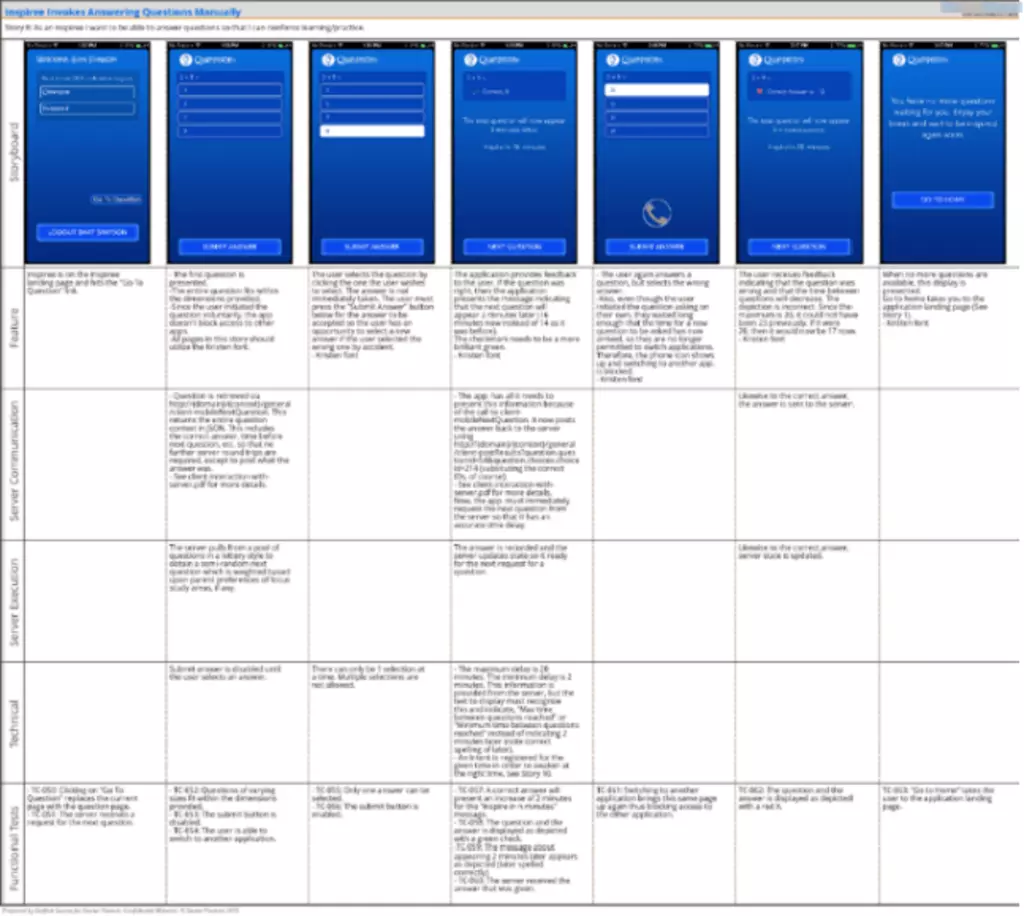
These swimlanes can be whatever you want them to be, but wherever there’s an intersection of a swimlane and a page mock, we’re able to present additional information about what is happening at that particular point of application usage.
A full-on storyboard is not always necessary. In most cases it is not necessary at all. We can instead use block element of a page to demonstrate the flow from one page to another. We would use the block element mockups when there is little need for additional explanatory text.
Whether using a full storyboard, or block element representations of a series of pages, in this step you want to illustrate the overall structure of the application. You used a rough outline of pages, created in the previous step, and further evolve the design. As the design is further evolved, you might want to make changes, like:
or any number of other decisions that improves the way the application operates and sustains the goals and standards of previous steps.
Are you on the right track? You now have enough of the rough sketch that you should be able to start getting information about how others perceive the application. It depends heavily upon the type of application, but you should be able to come up with a list of questions - open-ended of course - that elicit feedback on the usability of the application.
At this early step, you can really start to get some concrete information on how well the application will satisfy the jobs-to-be-done for your target customer. Combining both that goal and the goal of understanding the usability of the application, this is a great opportunity to really start to validate the market fit that you determined when you performed a proof-of-concept analysis.
You have received feedback, and you have made changes based upon that feedback. Now it’s time to really start fleshing out the pages. Block elements can be fleshed out into actual elements that would be used on the page. At this point you might make use of a wireframe so that your pages also include the spacing and styling that you are planning. You might include some representative data on the pages.
At this point, it is good not to go overboard putting a lot of time into the way the pages look. There is still a significant risk of pages being altered, maybe even drastically.
If you were going to spend time, then spend it creating alternate pages or paths through the application. Of course, do this only if you have additional ideas that you would like to get feedback on. Having pages with different designs, or multiple proposed flows through the application, allows the possibility of a kind of A/B test when you get feedback the next time.
Speaking of feedback, it is time to get feedback again. Ideally, you will want to have a mix of people that you spoke with before and new people. Each time you get feedback, it is good to include new people in order to get additional perspectives that aren’t already influenced by previous iterations.
At this point you want to simulate as best as possible the use of the application. In the initial feedback you might utilize the paper prototype approach. Look back to the earlier discussion on the paper prototype to see how to conduct that.
Assuming that there were some changes coming out of the last round of feedback that you received, you will want to make whatever changes seem appropriate and get some more feedback.
When you feel pretty good about the changes you incorporated from those requested so far, it might now be time to create the full prototype, which is fully clickable and pretty close in look and feel to what the final product will look like. A fully clickable prototype will now be something that you can present to a new group of users, and perhaps the previous ones, and get that final validation of your design.
You probably had the goals of the application in sight as you were putting it together and getting feedback. At this point, you want to review to ensure that:
Reviewing your goals makes sure everything is in place. Make changes as necessary.
Prototypes are not necessarily all unicorns and rainbows. There are some risks to look out for as you create a prototype. We will consider these three risks:
Prototyping should not become a net negative. There are some dangers. Here are some risks to look out for as you develop a prototype.
Spending a lot of time with a design can lead to becoming emotionally attached to a particular design. Guess whose opinion counts the least in producing a software product? Yep, it’s your opinion. The whole point of developing a prototype is so that you can test the design with the types of people who would be your customers. The graveyard of SaaS products is littered with products the product owner absolutely adored. The problem was, none of the customers adored it.
All of your product designs should be an exercise in being dispassionate. Be passionate about solving the problem that you uncovered in the jobs-to-be-done analysis. Be dispassionate about the mechanism for solving the problem. Solve the problem in the way the owner of the problem wants it solved, and you will be rewarded.
The prototype is not designed to be a work of art. Your goal is to spend the minimum amount of time necessary in order to get the answers that you need from the tests that you determined needed to be performed. When you are conducting the final tests and you are ready to send the prototype to a developer, you may then consider producing a pixel perfect representation of what the developer should create. Even then, I’m not sure that perfectionism should be the goal, but if it were to occur at any time, only then would it be the most acceptable.
Some aspects of functionality can be very difficult to model without a more significant build. Imagine if you were to prototype spreadsheet functionality and the world had no idea what a spreadsheet was.
Consider all the different types of functionality that comes out of entering data into the cell of a spreadsheet. The cell responds one way with text input and another way with numeric input. If you type the equals sign, and some text after that, not representing an accurate formula, the cell will indicate an error. Those are just a couple ways in which a spreadsheet cell responds. Consider the interaction between cells, and it becomes obvious that a lot of software development would be required in order to accurately represent spreadsheet functionality.
Most likely, your prototype depictions will fail to be representative with such complexity.
It is impossible to model a spreadsheet with a wireframe. With additional programming it might become possible, albeit much more costly. You could certainly create some shortcuts. For example, you might only allow one specific formula as a way to demonstrate formula entry? You might depict a group of cells, along with calculated cells, to demonstrate how that might work?
In such a case, it would make more sense to prototype those things that can be prototyped in the application (not including the spreadsheet), and either talk about something that is similar to the functionality that you want to create, or through a series of drawings depict the functionality you are considering creating. In the case of the spreadsheet, you would likely need a lot of drawings (electronic or otherwise) to communicate its functions. In such a case, do not feel as if you have to cover every bit of functionality. The goal here would be to represent key functionality and just provide a general sense of functionality in order to get feedback on whether it seems like something people would like.
Then, when you actually develop the thing you want to create, treat that like a prototype and collect feedback then. The point here is that just because you have left the prototyping phase and are now developing in earnest, that doesn’t mean that you can’t continue to get feedback. In such a case, it would seem quite appropriate to circle back and get feedback.
In fact, that’s what the role of customer success is all about. Building a product, from its earliest stage throughout a seemingly successful product/market fit, you will constantly be pursuing and utilizing feedback, if you’re doing it right.
As a different example, consider the world we are in now where people do know what a spreadsheet is. Suppose your application were to include something like a spreadsheet, it would be quite easy to paint with a broad brush stroke and tell users that the application would have something akin to a spreadsheet. You would mention the things that it would do differently, but it would likely be of little assistance to create a prototype or a bunch of drawings depicting it. If somebody doesn’t know what a spreadsheet is, you can simply show them a spreadsheet.
Are you convinced yet that you need to create a prototype and test it with your customers? This article presented quite a number of details about prototyping. Given these details, is it clear that creating a prototype of your application is a very valuable activity to complete?
In doing what was outlined in this article, you can validate that your product is a product that is desired in the marketplace. Obtaining product/market fit is a very difficult activity. Sean Ellis states,
In my experience, achieving product/market fit requires at least 40% of users saying they would be “very disappointed” without your product
The only way you can know this is by constantly communicating with customers. If you need to do this when you have a bunch of customers, then it is all the more important that you do it before you have any!
Even as you start building your product, there will be new entrants to the market, disruptive substitute products and changes in technology. There are, and will continue to be, many forces that compete against any given idea for a product, including yours.
Getting your user experience dialed in, building a prototype and testing and then finalizing the details in preparation of building an MVP can be a lot to take on if you aren’t experienced in doing so. If you would like help in completing this task, you will see that this is a service we offer.
If you would like to discuss your plans for creating a prototype, please feel free in reaching out.